
Good Afternoon, my friends,
I hope you are having a nice Sunday. It is dreary here, and we had snow yesterday but it's melted now. I am so glad our temperatures are supposed to be warmer in the next week. Night before last I got cold, and last night it was 18 degrees here in one-redlight WV.
I have a few things I want to share with you today.
A good friend of mine gave me a bunch of ear ring hoops and I decided to see if I could get out the crochet thread and my tiny steel hooks and see if I could make something pretty out of them.
I went to Moogly's Crochet Earrings Round Up
and started there. I made a really pretty pair but I cant show them to you yet. They just got delivered and I haven't talked to that person yet. When I do I will have a big post about it, it's pretty special!
Here is the pair I made out of regular acrylic ww yarn.
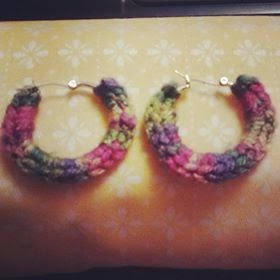
This is just a slip stitch and single crochet around. One round.
I did use a dot of clear nail polish to make sure that end ends stayed where I put them. This project only took a half hr or so. Even the fancier ones I made in an hour.
Every pair I have made have turned out lovely. I made fancier ones, but that's for another day :-)
Here is another project I was working on. I was at our local dollar store and was in the "As Seen On TV" aisle. They had something called "HOT BUNS". I swear that is the name. Anyway, my hair is long and I keep it in a ponytail constantly. I am really a short hair person but my partner doesn't like it short (men love Barbie hair) but what man does, really?
So I picked up the box and started reading. I came home, jumped on the computer and put Google to work. That's when I found something called "SOCK BUN".
Ok, I read all that and thought (as every crocheter would), "I can crochet that!" So once again I went searching and found this "CROCHET SOCK BUN" on Crochet Dynamite's site.
I got out my hooks and yarn and went to work.

Just 16 rows of Double Crochet

Here is the flat dc piece all rolled up and whip stitched together.

Here it is once I sewed the ends of the crochet log together.
TA-DA!

Here it is on my hair. I didn't roll it up because I need help keeping my short pieces in (you can see them sticking out). I have grown out my bangs and I have long layers that are almost gone, but not enough to not have to bobby pin them in place.
That is another good thing about making it in yarn. The bobby pins slide right through it and have something to adhere to besides slick hair.
So, the project saved me $10 bucks and it works just as good, if not better. One word of advice though. Make it in the yarn that your hair will fit around. Example, if your hair is thin and shorter, then use a fingerling weight and just make more rows so your crochet log will have some weight to it.
This was a fun project for me.
Now, for my dilemma. I posted a facebook picture asking which bag my friends thought I should make out of this Red Heart Lagoon I got on sale at Walmart my last yarn trip.
My girlfriend Callie, said she loved one of the bags and she would buy it if I would make it for her.
Sure! What an opportunity!
I got out my yarn. Started on the 17 crochet solid granny squares. No problem. That's easy.

I got the inspiration picture out of the bag.

It's pretty right, I love the style of it. That's why I chose it.

This is the bag pattern I used. You can see on the picture that it has all the styles for how ever many squares you chose to make.
Here is what I ended up with when I sewed mine together...


See my problem?
Apparently my inspiration bag is not on this picture...
Does this bag look ANYTHING the one above?
Be honest, I know it doesn't. This bag looks exactly like my first ever crochet project bag.

I love this bag. Notice you can see where I whip stitched it together. I didn't know about an invisible seam then. lol In my header I am wearing the shawl that matches this bag pattern. Yes, this was the first thing I made when I picked up a crochet hook. WHO picks a bag for their first project? You can see this FINALLY FINISHED! post all about my adventures making the bag. I adore it still.
As I was going I kept getting this severe dislike of this bag. The shape was all wrong. I knew the color would work if I could make it work.
I got to really looking at the shape on the inspiration photo and noticed that if I took out a couple side squares my bag would have the shape of the inspiration. So, I removed the little pointy ends you see in the bag when it is put together in the bottom photo.
Plus, as my partner not so subtly pointed out, there were "ridges". He thought the bag was inside out at this point. I had to try and reassure him it would be FINE, it was CUTE, but all along I knew it was NOT what this yarn was meant to be. So you see in the picture that I took out the bottom sides of the bag.
Here it is now once I pulled it all out and started over. Yes, I just couldn't leave it like that. I want to make things I am proud of all the way around.

So, I have started over with an invisible join to satisfy myself and Bub.
I think this time it is going to turn out lovely. I have the handles made, and I know the right placement of the squares this time.
I will update with the bag as soon as it's done.
It's my "Quiet Sunday Project"
and I have named it the #CallieBag.
I hope the rest of your Sunday is beautiful and you get to spend it what you love doing most!
Happy Hookin!
~Crystal
P.s...My next crochet post is about my lucky streak...I won something awesome and I HAVE to share!
No comments:
Post a Comment